Keeping the children amused doesn’t have to cost a fortune. You can enjoy a range of fun activities using just a few household items rather than expensive, over-packaged shop products. Have you ever thought about making your own face paints? It is a very cheap alternative to buying a pack and children just love to be covered in paint!
Make Your Own Face Paints
Here's what you'll need:
- 2 tablespoons of shortening, such as butter, lard, or solid vegetable fat
- 5 teaspoons of corn flour
- 1 teaspoon of vaseline/petroleum jelly
- Cotton wool
- Paper plate
- Food colouring
This is so easy to make - just mix the fat, corn flour and Vaseline together on the paper plate. Once they turn into paste, add a few drops of food colouring. Use just a little for lighter shades.
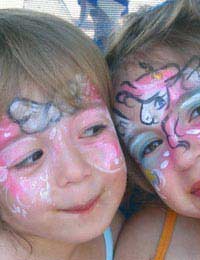
Now you can use your fingers or cotton wool to paint your child’s face. Some popular ideas include:
- Butterflies
- Flowers
- Hearts
- Skulls
- Daggers
- Spiders
- Spread vaseline on the chin and sprinkle on chopped up wool, string or paper for a stubbly beard
Make Your Own Play Dough
Another great activity is to make your own modelling dough. It’s much cheaper than buying the real thing and only takes a few minutes. (Kids enjoy making the dough almost as much as using it, so let them help you with the preparation.)
You will need:
- 2 cups of flour
- 2 cups of warm water
- 1 cup of salt
- 2 tablespoons of vegetable oil
- Food colouring
- 1 tablespoon of cream of tartar (optional for thickening)
Mix together the flour, salt, vegetable oil and water in a pan and then stir over a low heat. When the dough has thickened (and doesn’t stick to the sides of the pan) take it off the heat and leave to cool.
You now have to knead the dough vigorously until smooth and you can then divide it into small balls ready to colour.
Choose the colours you’d like and then add a drop of food colouring to each ball of dough. (Be careful when blending since it can stain your hands and your worktop!) Once fully blended, it is fine to handle.
When the children have finished creating their models, you can roll it back into balls and keep in an air-tight container to use again. (If the dough starts to dry up just add a few drops of water to moisten and soften.) It keeps for a while but when it becomes over-hard you will have to start again. Fortunately, it’s easy to make a new batch!
Why not try:
- A few spoons of glitter to make a special fairy play dough for your little princess
- Adding two cups of oats for a fun, lumpy textured dough
- Rolling into strips and making alphabet letters with your little learners
- Using cookie cutters to make funny shapes
- Making coloured beads with a hole through the middle. Leave to dry (or bake in the oven) then varnish and make a necklace using string or a length of floss. Little girls love rainbow necklaces!
- Creating a keepsake. Roll out a thick piece of dough and press your child’s hand into it to make a handprint. Write on their name and the year and cook in the oven for about an hour until golden brown. Finish with varnish for a lasting result
- Finally, try making scented modelling dough by adding a few drops of vanilla, almond or peppermint extract
Have a Bubble Day !
If you have a bottle of washing up liquid handy, you can turn a boring rainy afternoon into a bubble day? You just need: 1½ cups of water, ½ cup of washing up liquid and 2 teaspoons of glycerine to make your very own bubbles. If possible, leave the mixture for a few hours – or overnight if possible and try not to shake it otherwise it won’t work very well.
You can use an assortment of objects to make big and small bubbles - such as a wire coat hanger for extra big bubbles or a straw for small bubbles (just make sure the little ones blow and not suck!)
Another good idea that won’t cost you a penny is to keep old birthday and Christmas cards to use for craft sessions. Children can cut out their favourite pictures and words and make a big colourful collage. All you need are the birthday cards, a large piece of paper/plain card (preferably coloured) glue and safety scissors. Make it even more fun by using glitter to add the finishing touches but make sure you cover the kitchen table with newspaper before you start or you’ll be finding glitter on your food plates for a long time afterwards.


Your email won't be published. Comments are moderated before appearing.